How to upload a file using AutoIT?
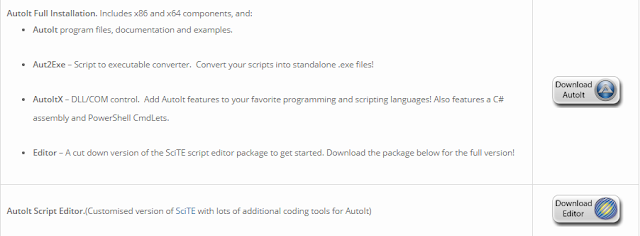
- Download AutoIT from https://www.autoitscript.com/site/autoit/downloads/ as shown in the below image
- Download AutoIT Script Editor from https://www.autoitscript.com/site/autoit/downloads/ as shown in the below image
- Double click on the "autoit-v3-setup.exe" to install AutoIT.
- Double click on the "SciTE4AutoIt3.exe" to install AutoIT Script Editor.
- Once you are done with the installation, you can see Identifier or Finder tool in the below path C:\Program Files (x86)\AutoIt3\Au3Info_x64.exe
- You need to double click on it to open Finder Tool
Methods to be used
==================
ControlFocus ( "title", "text", controlID ) : Sets input focus to a given control on a window.
ControlSetText ( "title", "text", controlID, "new text" [, flag = 0] ) : Sets text of a control
ControlClick ( "title", "text", controlID [, button = "left" [, clicks = 1 [, x
[, y]]]] ) : Sends a mouse click command to a given control
- We have to click on the "Browse" button as shown in the above image to upload a file. Once you click on "Browse" button, the below window appears as shown in the image below.
- Now we have to take the help of Finder Tool to identify the window objects such as "File name:" edit field and "Open" button. To do that we have to drag the below displayed icon and drop on the window object to be identified.
- For example, I need "File name :" window object to be identified. So I have to drag the icon as shown in the above image and drop on the "File name :" window object.
- To use the First Method i.e. ControlFocus, we need to pass 3 parameters "title", "text", "ControlID"
- Here "title" will be "Open" as displayed in the above image
- "text" is not required
- "ControlID" will be the combination of "Class" and "Instance" i.e "Edit1"
- Do the same steps for identifying "Open" window object.
- Now we will use AutoIT Script Editor to write the methods as displayed in the below image.
- We have to save this file in a specific folder. I have created a folder "AutoIT" and saved the above code as "FileUpload.au3"
- Now we have to do right click on the above file i.e. "FileUpload.au3" and select "Compile Scrpit (x64)" to generate "FileUpload.exe"
- We have to give the path of "FileUpload.exe" in the script to perform the window based actions to upload the file.
- Please find the complete script below for uploading a file using AutoIT.
package seleniumwebdriverbestpractices;
import java.io.IOException;
import java.util.concurrent.TimeUnit;
import org.openqa.selenium.By;
import org.openqa.selenium.WebDriver;
import org.openqa.selenium.chrome.ChromeDriver;
import org.testng.Assert;
import org.testng.annotations.Test;
public class FileUpload {
WebDriver driver;
@Test
public void fileUploadUsingAitoIT() throws InterruptedException, IOException{
System.setProperty("webdriver.chrome.driver", System.getProperty("user.dir")+"\\drivers\\chromedriver.exe");
driver = new ChromeDriver();
// Open Application Under Test (AUT)
driver.get("C:\\Users\\Rajendra Mahapatra\\Desktop\\FileUpload.html");
driver.manage().window().maximize();
driver.findElement(By.id("upload1")).click();
Thread.sleep(5000L);
Runtime.getRuntime().exec("C:\\Users\\Rajendra Mahapatra\\Desktop\\AutoIt\\FileUpload.exe");
driver.quit();
}
}


Comments
Post a Comment